Binding With Wire
Created by Tela Formosa Oct 2010 (Re-published on www.RockTumbling.com with permission)
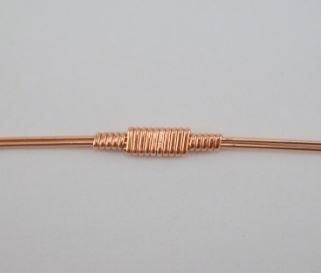
Example of the front of a wire wrapped bundle
using binding to reduce the bundle.
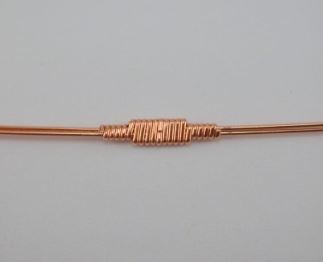
Example of the back of a wire wrapped bundle
using binding wires, with one binding wire
added on.

This lesson will show how to do neat bindings. It will continue with how to add a new binding wire to a row of binds, how to reduce bundle wires with binding wires and tips about metal working.
Learning to do neat bindings will greatly improve not only the aesthetic appeal of your work but, will also improve the physical integrity of your piece. Binding wires can be used as part of a design or you might choose to hide them, but you can seldom get away from using them at all.
This lesson will use round wires, which is more difficult than square wires, but NOT undoable. After you have learned to bind round wires, the rest is easy. Many techniques use the characteristics of how bound round wires behave. This lesson will show you how to bind, the rest is up to your imagination.
As with any art, this is just my way of doing it. Others may do it differently, feel free to do it the best way for you after you have the basics down. I have tried to be very thorough and provide good photos, however, if you have any questions, please don’t hesitate to post them to the tutorial page.
Copyright ©2010 Tela Formosa, Tela Formosa Designs. All rights reserved. These instructions are for personal use only. Please do not distribute, lend or copy any portion of this document. Reproduction and or distribution of these instructions in whole or in part, in any form, without the author’s written consent, is strictly prohibited. This tutorial is presented solely as an educational tool. You may make this project for limited sale, but do not mass produce, or claim it as your design. Please give credit where credit is due, it is the right thing to do.

TIP: If you would rather include square wires, then replace the two middle round wires with square. It will be easier to do the exercise, if you are having trouble with the round wires. The square wires will help keep the round wires from rolling as you bind.
Materials
- 32” of 22 ga Round Soft copper Wire
- 10” of 21 or 22 ga Half Round Half Hard copper Wire
- You can vary the amount you need depending on the amount of practice you want to do.
Tools
- Thin Flat nose pliers
- Medium Flat nose pliers
- You can use your chain nose instead
- Wire cutters
- A polishing cloth or soft rag
- Thin masking tape
- A thin blue Sharpie if you want to add marks to your wire (optional)
Step 1
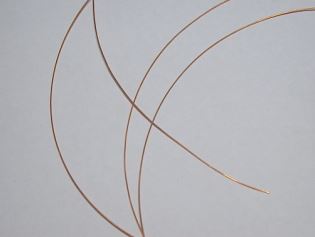
Cut (4) 8” lengths of 22 gauge round soft wire. They will likely be curved (not straight) coming from your source.
Cut about 3 inches of the half round for now. You will not need to work with the whole 10” at one time, as it is more difficult to work with as you practice.

Step 2
Hold the end of each round wire with a flat nose. Using a folded polishing cloth, gently pull each wire through. Don’t pull too hard or too often because you are work hardening it as you do. You just want to coax it back into being straight.
You shouldn’t need to do this to the half round unless it is tarnished. Your piece should be short enough that it will be fine to work with as is.
TIP: Do this as evenly as possible and make that a habit because when you pull unevenly you may have trouble with the wire later if you need to twist, curl or make spirals. This is especially true with square wire. You are, in effect, creating sections with different hardnesses. It seems unnoticeable to you but it is there. Proper, even pulling is just a good habit to get into.

TIP: One of the best ways to make sure your round wires won’t twist when binding them is to make sure they are not being forced to twist by your tape. As you get more experience, you won’t even need tape and then it will be more of how much pressure you used when you turned each binding.
Step 3 – Making the Bundle
Gather your round wires together. If they aren’t all straight and lying nicely together, go ahead and pull them, as a group, a few times with your cloth. If the very ends are crooked, that’s ok, as long as you can get them all together enough to put a small piece of tape across the bundle, near the end.
Hold the taped end up and run your fingers from your other hand up the lengths to make sure the wires are not trying to twist and turn. Put a small piece of tape near the other end. Take your time and make sure the bundle is straight from taped end to taped end.
Step 4 – Making the Hook
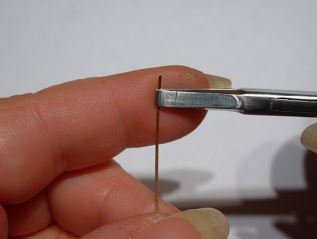
Take your 1/2 round wire and hold it in your non dominant hand going straight up and down with the back, flat side facing you. Take your pliers, grab the wire at the end at a 90 degree angle to the wire. With your finger used as support, turn the wire down to the left with your pliers. You can also start the hook lower and turn the wire over the pliers with your finger.
If you were looking at a clock, The top of the wire would be 12:00, the bottom 6:00 and you want to turn down to about 7:00.
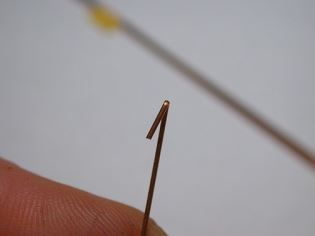
TIP: In really tricky spots, leaving a long tail on
your hook will help you hold and control the start of your binding.
Step 5
Notice the hook points down to about 7:00. What you are looking for is a hook that is longer than your bundle is wide. You want a tight enough turn that the hook bend will be a close fit to the wire.
TIP: The hook end should always be on the backside. If you need to start the bind from a different position, which would depend on what you are making, then start your hook by bending to the right instead. Just make a mental note of where you are starting your bind, and turn accordingly.

Step 6
Pick a spot near the middle of your bundle and place the hook over it. Keep your pointer finger under the two.
Make sure that the hook is angled enough to the left that the rest of the 1/2 round wire will be able to clear it were you to lift it up and around.
Push down the hook with your thumb. Let go.
Step 7
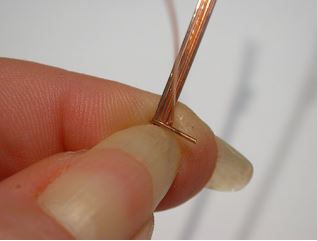
Now, hold the bundle and the tail of the hook together with your thumb or thumbnail and lift the other end of the ½ round up. It should be perpendicular to the bundle now. (Standing up at a 90 degree angle to the bundle.) If this is too awkward you can hold it with your thumb or thumbnail just below the hook, as in the picture.
TIP: Your hook will be a little loose, so try to keep the hook in as straight a position across the bundle as you can and keep it in position with your thumb or thumbnail. (As in the picture.)

Step 8
While keeping your thumb or thumbnail close to the turn and on the bundle, push the 1/2 round down across the bundle close to the last bind. You can do this with your dominant thumb or finger. As you get more practice you can just keep pulling it across after you have pulled it straight up.
With the tip of your pliers, gently squeeze where the 1/2 round turns over the bundle. (You don’t need to squeeze much.) This will keep it neat, create a work hardened spot and help lock it in place.
Turn the whole thing over. You now have one
binding on the front.
Repeat for one more binding across the front.

Step 9
We will now clean up the hook. Take your pliers and lift the hook end slightly. You will need to be able to cut it.
Cut the hook tail off at about 2 1/2 to 3 wires width.
TIP: Don’t pull it up too hard or fast. Remember it has been work hardened and it has a memory of being moved a certain way. Always remember when undoing bends to work in the backwards order of what you have done and try to make the same moves in reverse. You are trying to unfold a memory not create a new one.
Step 10
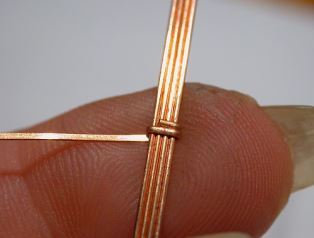
Take your flat or chain nose and gently squeeze the bindings down. Don’t do it too hard, you will flatten the rounded look of the binding wire and maybe mar the wire. You should now have a secured beginning.
TIP: If your bindings are slipping a lot, then for
this exercise, start again and pay close attention
to how you are pulling up and turning down the
binding wire up against the bundle. Practice using
firm but light, even pressure. You can also keep
going and add a few more turns before cutting off
the hook. I’ll get into fixing a loose start in
another step.

Step 11
Continue with your turns. Pull the 1/2 round straight up against the bundle and push over with your thumb. Then gently squeeze the bend to lock it down in place. Turn your bundle over for each turn.
TIP: This is really easy to do. In fact, it is so easy, many people can’t resist the temptation to do it fast. That’s where you end up with trouble. You really should take your time, do all the moves exactly the same for consistent wraps and pay attention using even pressure throughout.
Step 12
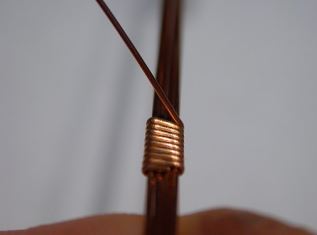
After about 10 binds, take the last bind that you squeezed down and gently lift enough to cut it. Cut it to fit about half way across the bundle.
TIP: The longer the run of your binding is on round wire, the more apt it is to twist. That is normal, but you can keep it down to minimum when done well. When wire wrapping, you seldom need a very long run of bindings. If you do, then after shaping as needed, the twist won’t be very noticeable.

Step 13
The front of your binding should run straight across your bundle. All of the outside bends should be nice and even.

Step 14
This is the back. It should also be neat, but the angle is just shy of straight across because of the angle of the hook. That’s ok. Sometimes the only way to tell the front from the back is by the slight angle of the binding wires.
TIP: If you ever need to start a bind on the front of your work, be mindful that the bindings won’t be perfectly straight on the front. You can, with practice get it very close to straight, though. It can be done. But, you will need to undo your hook from the front and cut it off on the backside when you are finished.
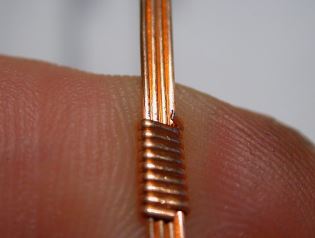
Step 15 – adding a binding wire
Did you run out of binding wire? Not to worry, it is easy and kinda cool to add a new piece where no one but you would ever know.
After finishing the end of your practice binds,
gently lift the last binding.
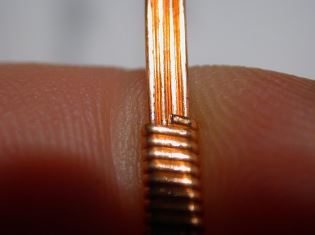
Step 16
Cut it off evenly across the middle and press it back down.
TIP: I already discussed metal memory. This step is a good place to discuss brittle metal. You want to try to keep to an absolute minimum how many times you undo a bend. Try to lift once and cut once. Every time you recreate a memory in metal, the metal gets more brittle. It is the extreme end of work hardening. The more times metal bends in one spot the more hard AND brittle it gets. You don’t want to break your wire! Not to mention that the bend gets unsightly, too.
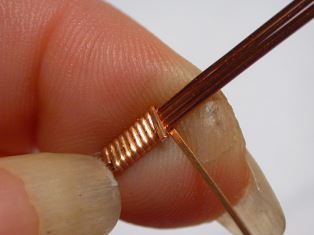
Step 17
Make a new hook and place it on the bundle where the tail will overlap the end piece that you just cut. Don’t forget to turn your hook properly.
TIP: If you get into the habit of making the same angle in your hook, you will always be able to fit another binding wire up against a row of binding wires without even thinking about matching the angle.
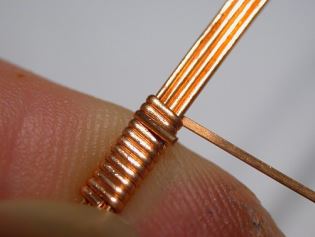
Step 18
With the hook still overlapping, make a few good turns.
TIP: You still want to always be turning your binding wires with your thumb or thumbnail close to the last binding. This keeps even pressure on everything and helps to keep everything under your control.
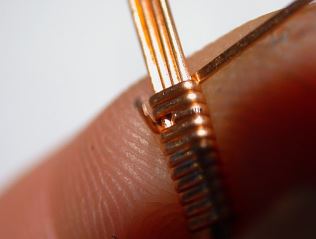
Step 19
After you have a few binds, lift the hook and cut it back to meet the old end. If you cut to about the middle on the original then you know to cut to about the middle on the new piece. Don’t worry if you cut it a little too short, it’ll hold. And, if you cut it a little too long, you can always cut some off. (But remember not to overwork your bends!) The objective is to have the two cut ends meet as close to each other as possible, close to the middle.
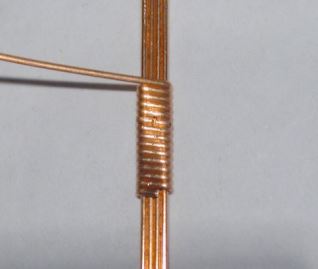
Step 20
Here you see the new wire added and a few more turns. You can barely tell where the two meet on the back. The outside turns are all neat and uniform.
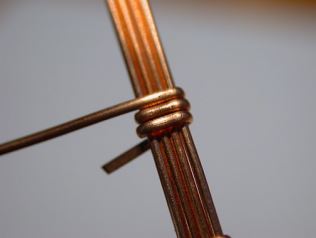
Step 21 – fixing a loose bind start
Did you have a problem starting the binding? Here you see a problem start. The first binding is too loose. As a result, the second binding is a little loose. The third is starting just fine and close to the bundle. They actually can be lifted and straightened out in pinch, but this is a very small amount of wire. Why risk messing up a whole piece? Just unwind the bad bindings back to the good one and keep going.

TIP: If you are working in a close or awkward space and you need bindings, then this will work to start bindings farther from where you need them. Just slide the bindings down in place and squeeze them down.
Step 22
Here I added another turn and cut off the bad bindings. I was left with a nice way to start. I didn’t leave any marks on the wire. You do know not to squeeze too tight, right? (insert nagging voice)
Since I only have a few bindings here, let me show you how easily you can reposition them without marking up the wire. If I had more bindings on here, I wouldn’t be able to move them so easily, but this is a good time to show you what a temporary binding can do. That is if you didn’t over work your binding by squeezing too hard and scratching up your wire. : )
TIP: Remember it is just as important that your bindings be close to the bundle, as it is that they are squeezed down hard. Your bindings, when done right, will hold your wires together, whether you squeeze them down real tight or not. After your binds are in place, a squeeze will help hold them in place, but will not necessarily improve how well they are holding your bundle together.
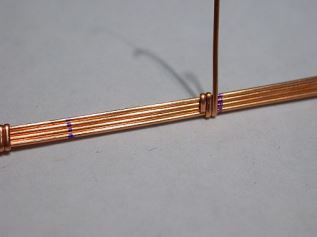
Step 23
Slide to the right…..

Step 24
Slide to the left……
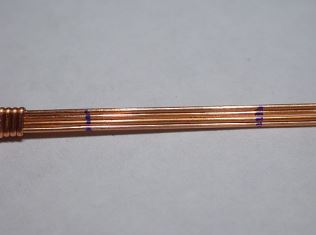
Step 25
No marks
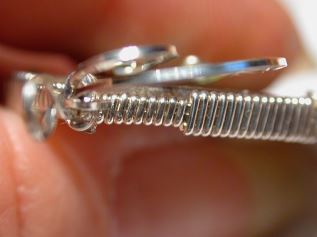
Step 26
In the vintage, abalone shell piece that is at the end of this tutorial, I reduced my bundle wires at the top because I didn’t want so many wires to work with at the bail, since this was to be a simple piece.
Here in the picture, you can see I went from four wires down to two. This is very handy to do and not at all hard to do.
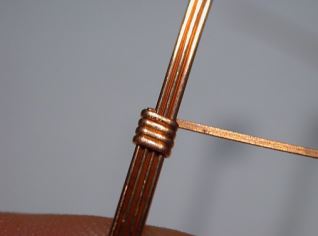
TIP: If your cut was not very close, use a flat file and carefully file it to be as flush as possible.
Step 27
After making a turn, cut the outside bundle wire flush with the binding wire.
Pay attention to the photo as to where you should be cutting.
With the work facing you and the binding wire coming up from underneath, cut the outside opposite wire from the binding wire.

Step 28
Go to the opposite side. Pull the binding wire back a little and cut the bundle wire as flush as you
can with the binding wire.
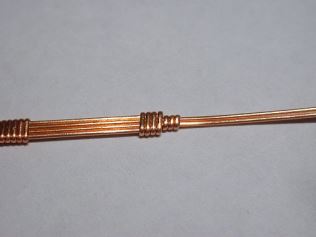
Step 29
Continue binding as normal, but with only two bundle wires.
Here you see it finished.
TIP: This is a good way to reduce wires at bracelet ends, too.
You should have some wire laying around to practice with and some room left on your bundle. A good thing to practice is applying even pressure on all your turns. Even pressure will keep your round wires from turning too much. What causes the twisting is when you are pushing the bundle wires inside your binding too hard. They will want to roll because the are round. Some small amount of twist is to be expected, but it should not enough to ruin any project. The example above is an inch long with no twist.
As you get more experience and do a few projects with a lot binding, you will find, at times, that
you will have to alter how and where you start your bindings according to the piece you are doing.
However, knowing the basics will serve to help you in any situation.


I hope you found this tutorial helpful. For comments or questions I can be reached at tela.formosa@gmail.com
Copyright ©2010 Tela Formosa, Tela Formosa Designs. All rights reserved. These instructions are for personal use only. Please do not distribute, lend or copy any portion of this document. Reproduction and or distribution of these instructions in whole or in part, in any form, without the author’s written consent, is strictly prohibited. This tutorial is presented solely as an educational tool. You may make this project for limited sale, but do not mass produce, or claim it as your design. Please give credit where credit is due, it is the right thing to do.
2022, re-published on www.RockTumbling.com with permission
