
Understanding Rock Saws Part 2 – Slab Saws
Slab saws are significantly different from trim saws and the role they play in the lapidary hobbies is critically important. It’s safe to say that many of the lapidary hobbies such as cabochon making, specimen polishing, and even sphere making are highly dependent on a saw that can cut rocks to thin slabs, or create flat faces on them. In this part two article we will cover slab saws, what they are, how to properly set up and maintain the saw, and what common features are available so you can make an informed decision about what saw is right for you.
Slab Saws
Description:
In over simplified terms a slab saw consists of a diamond blade mounted on an arbor inside a liquid containment box, with a device that feeds a rock through the blade. Because of the liquid nature of a slab saw environment, the blade arbor shaft is almost always driven via belts and pulleys from a motor located separate from containment box. Compared to trim saws, slab saws have a much wider variation in available sizes for the most flexibility, most lapidarists desire to own as large of a saw as they can manage in their work area. The most typical slab saw size range that we encounter on the forum is between 12 inches and 24 inches.
Setup and Maintenance:
Note: For purposes of giving you the very best information and advice that we can, this article will not even address filling a slab saw with water. It can be done but it’s a very very bad idea on a many levels.
- For cooling and lubrication of your very expensive diamond blade, and for rust protection of all metal parts inside and outside of your saw we highly recommend using oil. Many lapidarists on RTH Forum prefer to use mineral oil because it can be purchased in bulk as a horse laxative at a fairly reasonable cost.
- Same as with trim saws, because of the constant presence of oil around these saws, and with slab saws typically using larger electric motors, make sure to set up your machine on a properly grounded circuit, equipped with a GFI device outlet. To use these devices on anything other than a fault protected circuit is dangerous.
- Most often slab saws come with the motor already mounted and the most common locations for motor mounting are below, above, or behind the saw due to the least chance of coming in contact with flying oil.
- With slab saws, fill and maintain the oil inside the saw reservoir at a level that covers at least 1/4 of an inch of the bottom of the blade. For many slab saw owners the visible diamond band that circles the outside of the blade as their visual indicator of how much to fill the saw reservoir.
- With oil cooling and lubricant and proper “cut-starts” as we will talk about in the basic operation section, slab saw blades tend to last a lot longer than trim saw blades do. They do however still need to be dressed periodically using a quality diamond blade dressing stone to expose fresh diamonds. Cutting certain rocks will have a dressing effect on the blade and lapidarists on the forum also mention cutting a fat piece of obsidian every now and then for just such a purpose.
- Belt tension is important and should be checked periodically to make sure the belt is tight and free of liquid and debris. Slab saws tend to have a lot of nuts and bolts connections inside and out so always keep a close eye on pulley set-screws, and all parts of the system and correct anything you see has vibrated loose.
Basic Operation:
Every successful cut you make with your slab saw starts with a good cut-start, and if you follow these next few steps every time you can achieve that.
- Clamp the rock in the vise VERY tightly. When you think you have it tight enough, exert force on the rock with your hands to see if you can get it to move. If the rock even wiggles in the vice, it is not tight enough. Many of us use a tool such as a large crescent or pipe wrench to assist us in getting the vice very tight. If a large rock moves or releases from the vise in the middle of a cut it can cause major damage to your blade.
- Don’t overwhelm the saw. Just because you can get a rock to fit in the vice doesn’t mean it should be cut on the size of saw you have. Pay particular attention to the height of the rock in the vice. If it exceeds the vertical cut distance of the blade and you start anyway it’s going to be a very long and worrisome cut.
- To go along with the previous step, if your saw has a feed speed adjustment pulley (multiple grooves with small to large circumference) or other device to adjust feed speed, make the adjustment according to the rock you are cutting. A smallish soft material rock can safely be cut on the fastest feed speed setting. If however you are cutting a large agate or other very hard material definitely put the feed on the slowest setting and let the feed unit take it’s time getting the cut through the blade.
- Push the clamped rock up until it makes contact with the blade and make sure the blade doesn’t deflect off the rock to the left or right due to a rounded rock surface. This is MAJOR trouble that can easily ruin your blade if you try to start the cut on a rounded surface that makes the blade slide off instead of engage in a cut. It’s better to stop and take the rock back out and grind a flat spot for the blade to engage with than it is to risk ruining an expensive blade.
- After moving the vice forward to test where the blade meets the rock, back it off away from the blade a bit, maybe 1/4 of an inch, and make sure the blade can spin freely by hand before turning the saw on. This allows your saw the best possible chance at a good cut start even if the rock/blade meeting surface was not ideal.
- Stay close to the saw with each new cut start so you can react quickly if something goes wrong. Even if the cut has started perfectly and is humming away, it’s still a very good idea to stay in ear-shot of the saw just in case something goes wrong, and so you can hear the completion of the cut when the slab drops, and you can react quickly to get to the saw.
- Try to never open the hood on a slab saw while the blade is still spinning. This will literally cause a spray of oil to escape the machine and hit you right in the face depending where you are standing.
- Beware of the cloud of oil mist when first opening the saw lid, especially after a long hard cut. This mist is literally rock oil in aerosol form, so always take steps to avoid breathing it and don’t let it accumulate and settle on everything in an enclosed room. We highly recommend that you employ direct measures including air mover fans positioned to blow directly at the front or side of the machine in such a way to quickly get the cloud away from the operator area. If you’re cutting in a garage, always keep the fans on and the large door open at all times.
- When moving the vice carriage horizontally to line up the next cut, write down or remember the number of spins of the adjustment wheel you made so that when you find the perfect slab cut thickness you can repeat that measurement consistently every time.
Clean Up:
- One of the advantages of using oil coolant in your a leak-proof saw reservoir is you don’t have to spend quite as much time cleaning up and messing with raising or lowering the coolant level like you have to do with trim saws. With eyeball checks on the oil level, cleaning up a slab saw can be done as often as you wish or be completely neglected until the point where your oil is full of mud and debris and is taking on a gelatin consistency. We have members who range on both sides of the slab saw cleaning spectrum and this DIY muck sucker was made for those who tend to put off cleaning for a bit too long.
What follows is a brief overview of common features found on slab saws. This is not a review or recommendation of any specific models shown or mentioned.
Liquid Containment Box
As shown on this photo of rxscram’s beautiful Homemade 18″ Slab Saw build, a good leak-resistant reservoir is at the heart of the success of a slab saw. When properly mounted, the diamond blade should dip approximately 1/4 of an inch into a pool of blade-cooling oil and should never be allowed to run dry. It’s very important to make sure your saw has a snug fitting lid and no unnecessary openings through which spraying oil can and will escape. It should go without saying but the lid should never be lifted while the blade is spinning.
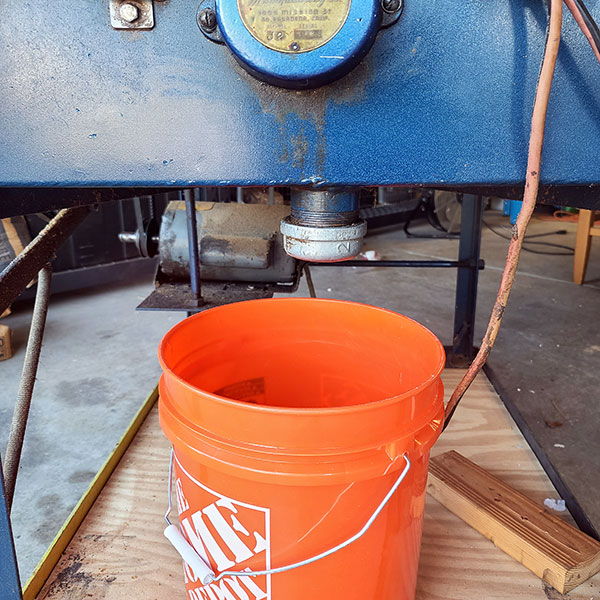
A Good Drain is Important
Cutting rocks in oil is a dirty job that creates a lot of mud and muck. Slab saws should regularly be cleaned out of the sludge that has accumulated and a good drain system is important. The vintage HP 18″ saw shown in the photo has a 2″ galvanized pipe installed and capped and draining the tank is accomplished by removing the cap and scraping oil and muck out of the drain. Some smaller benchtop saws such as the ever popular Lortone LS-12 have a small drain in front which isn’t nearly as practical but better than nothing.

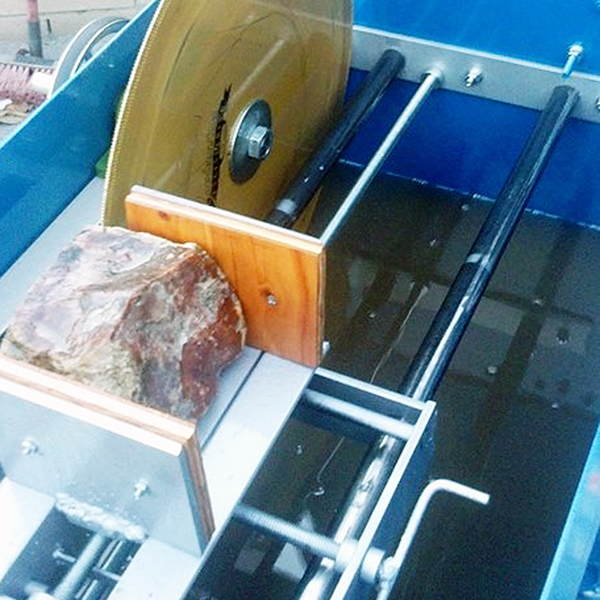
Internal Blade Spray Guard
Most blade spray guards are not as fancy as the one pictured here from Peruano’s homemade 12″ saw build but it illustrates the point. A well-adjusted blade spray guard device is very important and if the device is missing an enormous amount of oil spray will occur inside the saw cabinet and leaks will occur, especially in places where the lid meets the sides of the reservoir. A saw that does not leak much oil is often the difference between being able to keep the saw in a family shared space such as the garage or not.

Rock Vice and Carriage Mechanism
The rock vice and carriage mechanism are the heart of the slab saw. With the rock securely tightened into the vice, the machine moves the carriage and rock into contact with the spinning blade thus beginning the cutting process. Upon completion of the cut, separate controls are used to pull the carriage and rock back out in front of the blade, and adjustments are then made to move the rock horizontally with the blade. The above actions, if done the same way every time, will help the lapidary to consistently create rock slabs that are of uniform thickness.
Auto Feed Mechanism
Slab saws small and large, almost always have an automated system of moving the vice which contains the rock, the length of the saw from front to back, thus causing a slab to be cut off the rock. Most typically this auto-feed system is driven by a smaller motor or gear driven from the belt and pulley system. The vintage saw shown in the photo employs a gear driven shaft system mounted on the front of the saw. A pulley on the left of the shaft spins and supplies movement through a gear and into a threaded rod to which the rock vice and carriage are attached.

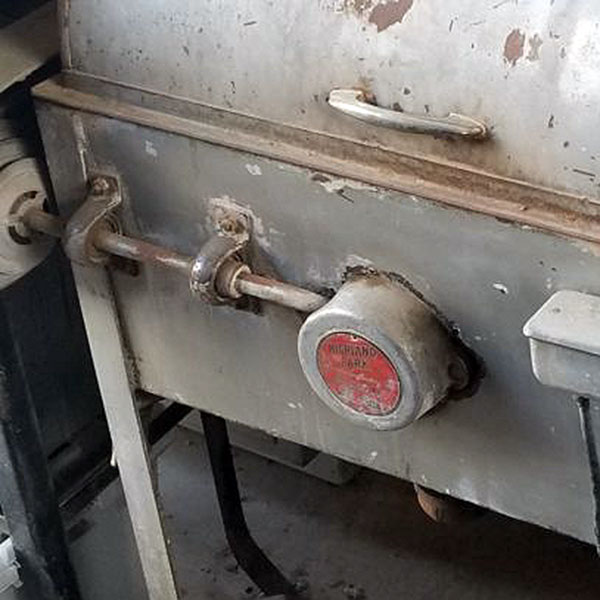
Automatic Stop Device
Stopping the rock vice carriage after it has completed the cut is very important because on many saws the carriage rides on expensive threaded rod that spans the saw from front to back. If the saw does not stop and the operator doesn’t catch it, the carriage will jam against the rear wall of the saw causing damage to the threaded rod and more. The auto-stop device shown on this vintage HP 18″ slab saw is a chain connected between the carriage and the off switch. The operator adjusts the chain to approximate the length of the rock to be cut.
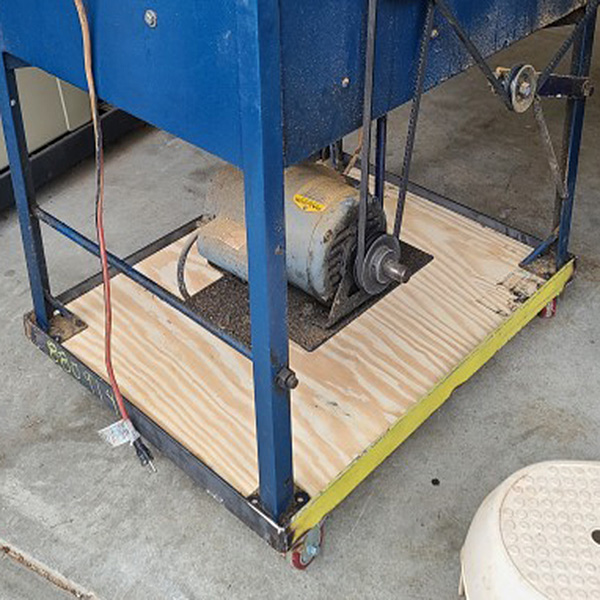
Mobility and Flexibility
Some of the smaller slab saws are considered bench-top units, but most saws over 16 inches are stand alone units with legs. If your cutting area is a work shop then mobility is not typically an issue, but if you keep your big saw in a shared space, the ability to move it around is important. Many hobbyists purchase used refurbished saws, and it’s possible that the original casters are not present. This member added DIY mobility and a nice storage shelf to a formerly fixed position saw, using 2″ angle iron and casters from Amazon.

Viewing Window
Full size slab saws do not come with the huge viewing windows like this DIY homemade slab saw by member rockbottom. Vintage saws with completely clear hoods were made for a while but it was learned that they stained and became brittle very quickly. Some modern saws still do come with smaller viewing windows, and basic care and maintenance of the window is very important, including cleaning after every use, because dirty saw oil left on the viewing pane will begin to stain it to the point where it is unusable.