TLO Prong Wrap Tutorial
A free start to finish tutorial for a unique wire wrapping method
By: Tommy Lay

The moniker TLO began innocently enough – while exploring the lapidary arts, cutting and polishing rocks and making cabochons and stone pendants for family and friends, I posted a few pictures online and a friend asked where she could get her hands on a “Tommy Lay original.” My wife giggled and started using the name and seeing as how she is my largest customer, the name stuck and became our Etsy store name.
The inspiration for this method of wire wrapping stones came from my search to find something unique and different – something that my fat fingers and artistically challenged mind could get wrapped around with reasonable success. While studying various wire wrapping videos on Youtube, I stumbled upon a video by Wyatt White where he demonstrates Soumak style stone wrapping which includes weaving. I gave it a quick try and it didn’t go very good but I liked the concept of only having prongs on the front, allowing the stone to be the star of the show. After a few, less than memorable early attempts, a unique style began to take shape.
As we get started, the first and most important step of this entire tutorial is to plan your work. Lay your stone down on a piece of paper, trace around it and plan out where you want the prongs to be, relative to the shape and patterns of the stone. You’ll also want to decide the shape of the prongs, and how many.
Choose your stone to fit the style.
When it comes to pendant stability, certain cabochon shapes excel with this style of wrapping such as rectangles or those with at least one flat edge. Choose your stones wisely with stability in mind. As you can imagine a circle shaped cabochon would spin around within the prongs while a square would be extremely stable and unmoving.
As is usually the case when wire wrapping stones, you have many options available on how many wires to use for the frame and how to shape the bail. For the purposes of this tutorial we will be using a six-wire frame, with the fully wrapped bail that became my most popular seller. The six-wire frame style is characterized by six decorative prongs at the top of the pendant, and five sets of two prongs around the rest of the piece. I have also done variations with six prongs on top, six at the bottom, and one set of two on each of the right and left sides.


Plan your starting wire lengths. For an approximately 40mm to 50mm tall stone you are going to need the two outside wires of the frame be approximately 12 inches long – the other five wires can be the same or trimmed as shown. Two outside wires at 12 inches and four inside wires at 8 inches should produce consistent results with a 50mm x 30mm stone without excessive waste of expensive silver wire.

I recommend practicing with copper wire to start, then moving on to sterling silver when you think you have the hang of it. For this tutorial we will use sterling wire. I have found the combination of 21 gauge, square, dead soft wire for the frame, and 22 guage, half round, half hard wire for the bindings creates very clean results. Experiment with combinations like this and come up with what works best for you.
I personally like purchasing my wire in spools from RioGrande but there are many sources for wire so those decisions are yours.

These are the basic tools used to create one of these wraps. You will need a ruler to measure your starting wires, then again later as you shape the prongs. A graduated mandrel tool is very important, as are round nose pliers, flat nose pliers, and a good pair of side cutters.
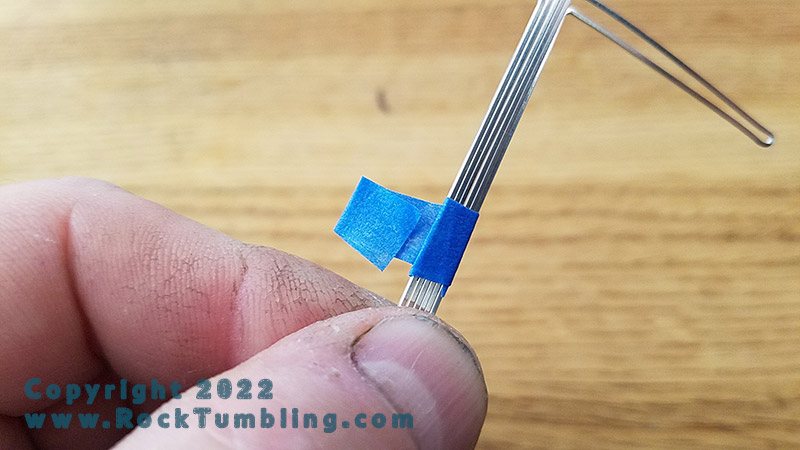
Clean removing blue painters tape is my favorite and I don’t hesitate to use it liberally. Some wire wrappers have the skills needed to avoid this step, but for me I always cover the tips of my pliers with tape to avoid damaging the delicate wire. I also cut and save about ten loose pieces of tape approximately 1/4″ x 2″ before I start, and I use them to tape various steps while I work.

Cut and lay out your wire as shown with the longest two strands on the outsides.

Clean and straighten your wire very well before you start wrapping. I like to use the yellow Sunshine Polishing Cloths as recommended and provided by master wire wrapping artist Tela Formosa. Grip the very end of each piece of square wire with your flat pliers and pull it through the cleaning cloth which hou are holding in your other hand, cleaning and straightening the wire at the same time.
Just a gentle but firm squeeze on the wire as you pull it through the cloth is all you need. Be very careful not to over work the wire during this process because stretching and hardening can occur and you dont want that.
The cleaning effect will be visible as black marks on the cleaning cloth.


The next step is one of the more tricky steps of the entire tutorial so take the time and get it right. First, isolate the two outside wires – these are the longest wires you cut – and tape them together. With the two square wires perfectly lined up with each other and taped, use your flat pliers to make a tight 45 degree bend approximately 4 inches up from the bottom.

Bend both wires over by hand in unison, then use your pliers again to create another hard 45 degree angle as shown to return the wire back to the direction it was originally headed. The bent portion to the side should be approximately 1.5 inches – depending on the size of the stone. See the next few photos show what the bent wires should look like when you are finished.

Lay out your wire again, you will notice that the two outside and the two inside are approximately the same length now. If you cut all four of the inside wires at 8 inches, all six wires will be approximately the same length at this point.

Flatten out your wires so they fit snug against each other and attach a piece of blue tape holding them together in a flat and tight stack. Apply the adhesive end of the tape facing down, directly on the wires, then wrap the tape around twice. Never let the adhesive side of the tape touch another adhesive side of the tape or it will bond agressively and become a pain to remove without affecting the wires.
Squeeze the left and right bent wires together to take out as much of the slack as you can and apply another piece of of tape to the top of the wire stack. This is what you should have it looking like at this point.

Cut a long piece of the 1/2 round wire and clean it with the cloth. The binding wire is thinner and more delicate than the square wire, so be extra careful to be gentle and not put too much tension on it. It’s difficult to say how long it should be because it varies with the size of the stone you are working on and what the finished height of your bale will be. For a fully wrapped bale like what we are doing in this tutorial, about 30 inches should suffice. I always seem to either over estimate and end up with a half a foot or more wire left over, or I run short. It’s better to over estimate and get the job done than it is to under estimate and have to change plans because you ran out.

Start near the bottom of the design as shown and begin making a flat and compact wrap around all six pieces of the wire stack. Depending on the shape of the stone is where you start the wrap. With my taped frame laid down on my plan drawing, I marked a spot approx one half inch from the bottom of the stone and started the binding there.

Each time after tightly (without stretching the wire) completing about a half a dozen wraps, use your square nose pliers to firmly but gently flatten out your work so far. This also helps the square wires of the frame to sit flush and tight to each other.

When you reach the tee created by your 45 degree bent side wires, continue with the binding wire as far into the corner as you can without it beginning to turn the corner.

Continue on at an angle across the span on what you have determined to be the underside of the wrap. This is your opportunity to bring the 45 degree angle side wires as tightly together as possible. You will probably need to loosen your top tape to allow the side wire to move and come together. Don’t worry too much about how loose or tight the side wires are for right now, these be cut and separated and have their own binding later as you will see.

After getting the side wire joints as tight as you can and continuing on with a handful of binding wraps, flatten out the entire joint with your pliers.


Continue tightly binding the wire stack up towards the top, flattening on regular intervals. Using the stone as a visual measuring point, continue wrapping and flattening until the binding has reached DOUBLE the size of what you want the finished bale to be. This is because as you will see we are going to fold the stack back over itself creating the bale hole.

Using your originals design drawing, place a thin piece of tape around the stack to mark the distance between the 45 degree side wires and the start of the bale.
Important!: This is the moment when you need to be completely aware of which side of the wrapped stack of wires will be positioned against the back of the stone and which side will be visible when viewed from the back of the pendant. In the next photo I have positioned the stack so that the binding wire when it crossed the junction of the side wires will be up against the flat backside of the stone.
Note: It’s your preference if you want the cross wire to show or not. For this tutorial I chose to place the cross wire against the stone, thus hiding it from view when looking at the back of the pendant.

This step is optional if you’re good at eye-balling things but I found it very important and helpful to place a second thin piece of tape across the stack as a marker indicating the size of the double binding that you will see soon. From this photo you can see how little wire I had remaining on this job. If you believe you are going to run short then it’s better to shorten your bale plan now. It’s critical that you leave yourself enough wire to do the double binding finish as you will see in a minute.

Unfortunately I didn’t photograph this in action, but using the desired segment of the graduated pin tool or any other similar round object, gently fold the wrapped bail up and around and back over towards itself. Make sure you don’t make turn that forms the bail opening too tight – for asthetics you will want as gentle of a curve as possible which lets the binding wires stay neat and uniform against each other around the curve at the top of the bail.
Continue to tightly wrap the wire stack until you have reached the second marker tape indicating where the double binding portion of the bail will be. When you are satisfied that you have reach where you want it, gently remove the second piece of tape.

With the second piece of tape now removed, apply pressure to the bail until it lays flat against the wire stack.

Now tightly as possible without ruining the binding wire, begin to wrap all the way around the top of the wire stack and the bindings below. Continue on until you reach the first piece of marker tape that we placed around the bindings. In my photo you can see how short I ran on wire – uncomfortably so and the result of ending it early was it changed the position of the cross a bit. Not a big deal overall but I would have rather had a few more inches of binding wire.

Leave your binding wire loose for now and using your flat pliers, gently but firmly slide them between the bottom stack and the top stack – being careful not to let the binding come loose – again this would have gone easier if I had not ran short on the binding wire. Give the top wire stack an abrupt bend vertical as shown.

Remove the remaining piece of spacing tape and using pliers firmly pull and tuck the loose end of bailing wire away under the stack.

We will now turn our attention to the bottom of the stack where the binding began. Trim the original loose end of the binding wire and flatten it against the wire stack as shown. Remove the final remaining piece of tape from the stack so that the 45 degree side wires can move together tighter as we begin to wrap them in the next step.

Cut a new piece of binding wire, this one will be quite a bit shorter than the original piece but once again, don’t run short. Hold the wire across the junction of the 45 degree side bends so that the two binding wires form an X as shown then, firmly begin to bind the side wires together. Same as early, give it a few wraps then flatten with your square pliers. It’s entirely your choice how far you want to bind these wires out to each side. I typically go maybe eight wraps around then clip the wire off paying close attention to clipping it on the side of the stack that is against the stone.


Cross the X and begin wrapping the other side for the same amount of wraps you did on the first side.

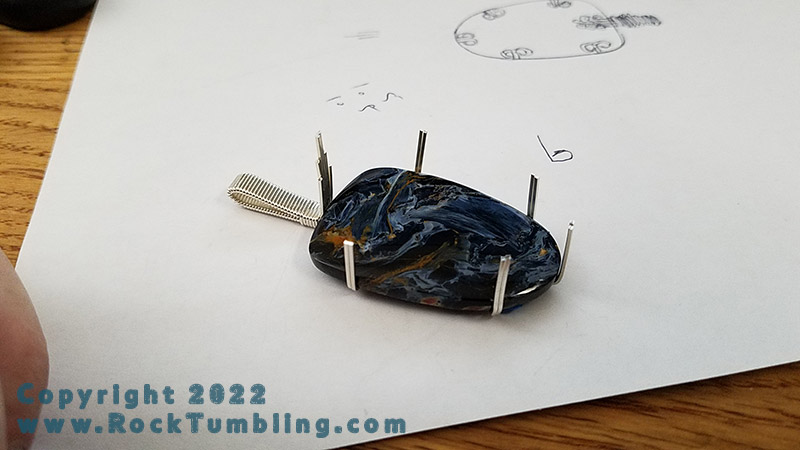
Lay the piece back on your design drawing and spread apart the bottom six wires in groups of two so that they line up where you want them. Make sure that you adjust the design for any shortages on the original planned bale wrapping size.

Feel free to carefully trim off a measured amount of the extra wire at this point if you wish. Again, use caution – you can’t put it back once you cut it.

Similar to what we did across the center of the stone, do this again using one piece of binding water to wrap around the two angled legs, crossing in the middle. Be careful to trim the binding wire on each leg so that the loose end is on the side up against the stone.

Add one more set of binding wraps on the very bottom straight leg to match all four of the previous legs. This next photo jumps ahead to the finished piece and is for visual reference of the leg wrapping only.

Tape the wire frame securely to the back of the stone and once you have it exactly where it needs to be, firmly and forcefully bend all five of the legs to contour around the shape of the stone. Get this step as nice and tight as you can and it makes for a much more secure piece when you’re finished.


Using the pin nose pliers, now is a great time to practice your flower loops on the scraps of square wire you trimmed off. I had fairly good results with making a small L shape bend then grabbing on to it and turning it into as much of a circle as I could. Which ever method you decide on, do it on every piece for consistency.

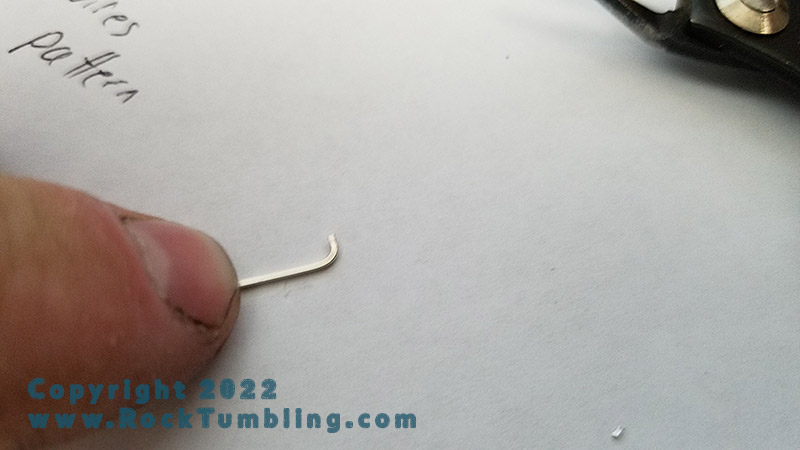

Carefully measure and mark each wire for cutting. I typically use 1/2 of an inch but you can develop your own look and loops style as you go. Plenty of room for interpretation on these finishing steps.


On this six wire frame I like to stagger the prong loops by 1/8 of an inch each. The longest wire is measured and cut at 3/4 inch, the second at 5/8 inch and the shortest at 1/2 inch. Now is the time to do a little finger nail filing on the ends of the square wires to remove any visibly uneven cuts or burrs.

The next steps are key to a tight fighting stone and prongs that lay flat as possible against the stone. Firmly press the three bottom wires against the stone first, then remove the stone and press them down even further.

Now that we are ready to do the final set on the stone, be sure to give it a good cleaning to remove oils and debris your hand and the tape adhesive.

Set the stone back into the frame and as tightly as possible without harming the stone, bend the remaining arms across the front of the stone.

Using your pen pliers, begin to create your flower loops on all sixteen cut wire ends. As you twist the ends of the wires into the loops, use a downward circular motion which finishing the loop very tightly against the stone – again without scratching it of course. I use tape on the ends of the pliers to help me not scratch both the wire and the stone. For the bail grouping start with the shortest wires first and work your way outward.


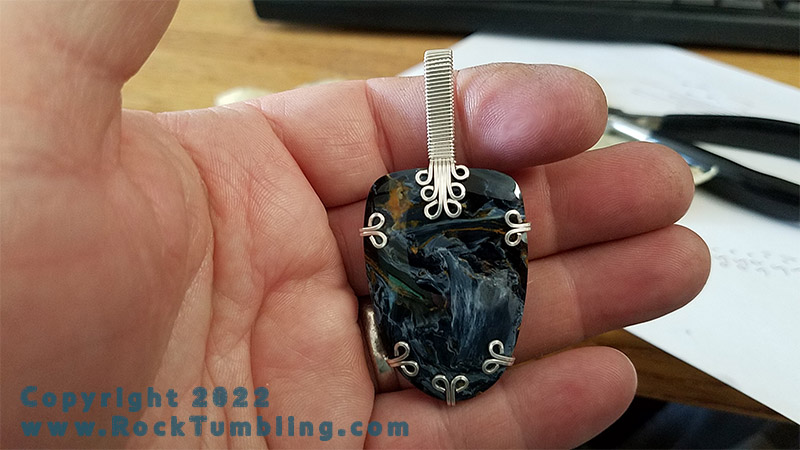
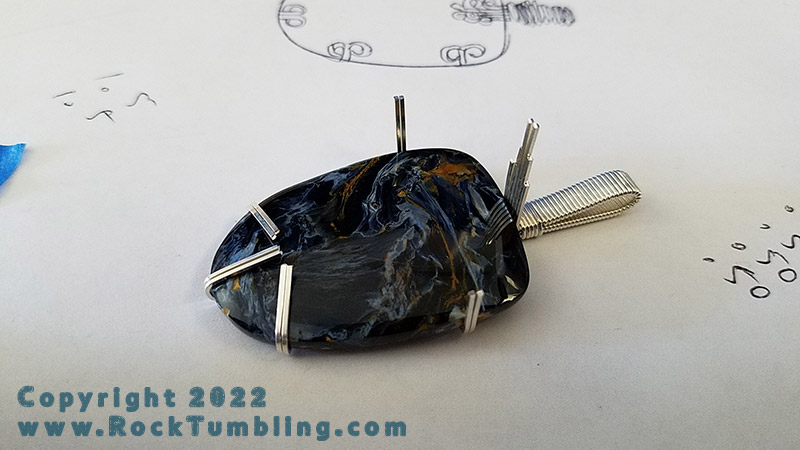
Thank you for reading this tutorial, good luck on your piece and I hope that I’ve gotten you close enough so that it looks something like this!