
Orienting Thundereggs for Cutting
By RTH Member: David Crosby (1dave)
Posted: Jun 10, 2014

Where to cut a thunderegg depends on what outcome you want. The biggest face, most slabs, internal structure, best patterns, dendritic patterns, etc.
Sometimes you can make good guesses from the outside appearance, but even then you need a supply of multiple thundereggs from the same source to see how they usually formed.
If you are fortunate enough to dig your own thundereggs, a good practice is to use a permanent marker to mark a T on top as gravity often determines what happens inside. This does not always help as earth movements may tip the hardened flows any direction during any part of the later fill sequences.
A brief introduction on how thundereggs form:
1. Magmas are modified over time. Mantle material is heavy, mostly iron and magnesium. As continents move over ocean floors (subduction), lightweight surface minerals are forced down and melted, cooling and contaminating the magma. Heavy minerals crystallize and drop out to the bottom of the magma chamber. As the magma makes it’s way to the surface it melts the light minerals around it, adding to the contaminants, usually a lot of silicon. First lavas are olivine, next basalt, then andesite, granite, and finally [b]rhyolite and obsidian. These last two are where thundereggs are formed.
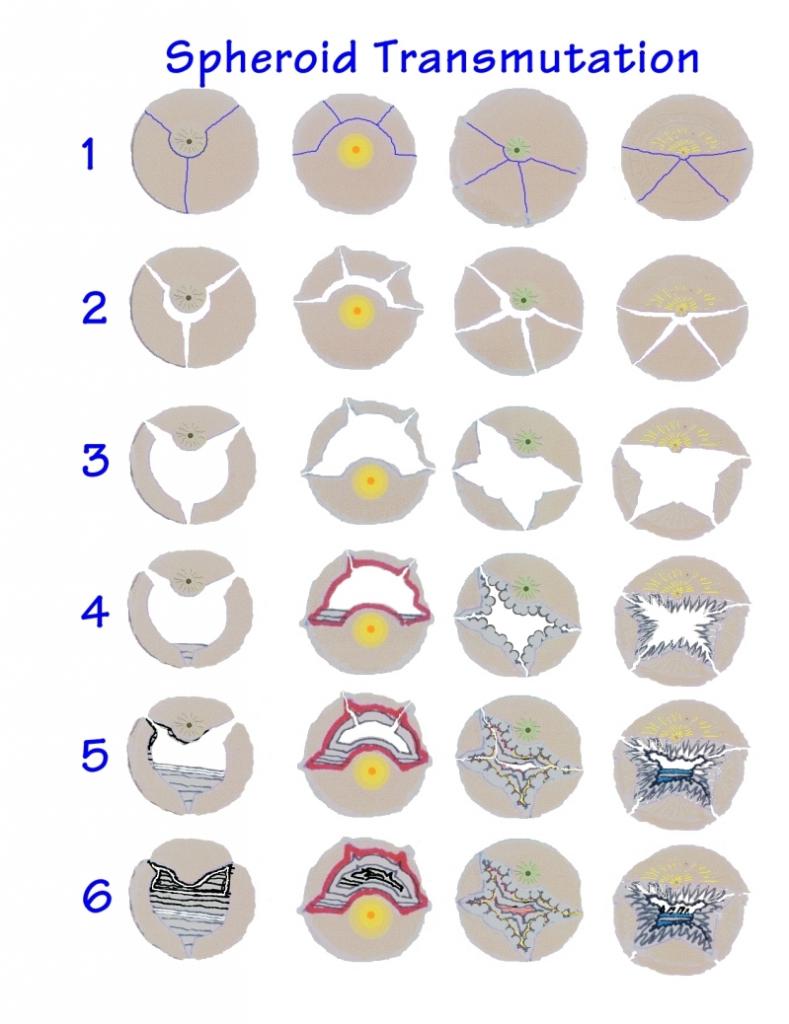
2. Highly silicious magmas (around 65- 80%) with a 1-3% water content begin crystallizing as spheroids.
Above 1100 degrees C, silica crystallizes as crystobalite fibers. Highly silicious magmas are very thick and viscous, but water content makes it fluid and runny, like adding ball bearings to layers. This allows glide planes to slip and slide, allowing silicon molecules to come into contact with other molecules that normally could not happen. They form like dandelion puffballs.
Geologists call this “spheroidal structure.”

Cristobalite needles begin radiating out from a seed molecule, forcing impurities away, and then the “endothermic exothermic dance” begins. The friction of crystallization generates heat! So much so that it becomes too hot for cristobalite to crystallize, but just right for feldspar (the constituents of which have just been enriched) to resume, so a layer of feldspar encapsulates the needles. The magma cools down and cristobalite resumes with another layer of needles. Layer after layer is deposited as the spheroids grow larger and larger – up to ten or twelve feet in diameter!

3. As the magma finally cools and contracts, internal pressure drops slowly allowing the trapped water to finally expand into steam, up to 2,000 times it’s original dimensions. If the flow is still moving the spheroids can be stretched out into torpedo shapes. If close to the surface, as pressure decreases they can blow to pieces like a bomb. The deeper in the flow they were, (also, the less the water content) the less they were able to open. Geologists call this “lithophasal structure.”

How they opened also depended on where the water concentrated. In some flows it was in the upper part of the spheroid and there is where the expansion took place. The Spencer Idaho precious opal thundereggs were the reverse, most of them pushed the old center up with the cavity below. Occasionally the water collected in many layers, and forced many of them apart.

Mexican “Coconuts” usually split right to the center (because of so much calcium?) but usually the center sphere remains attached to the largest plate.
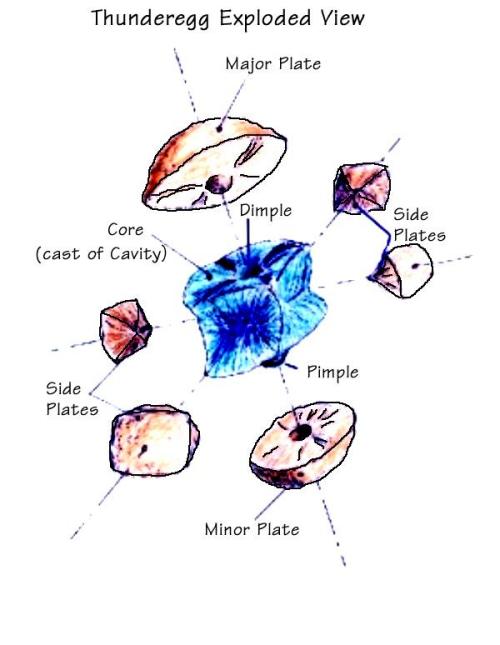
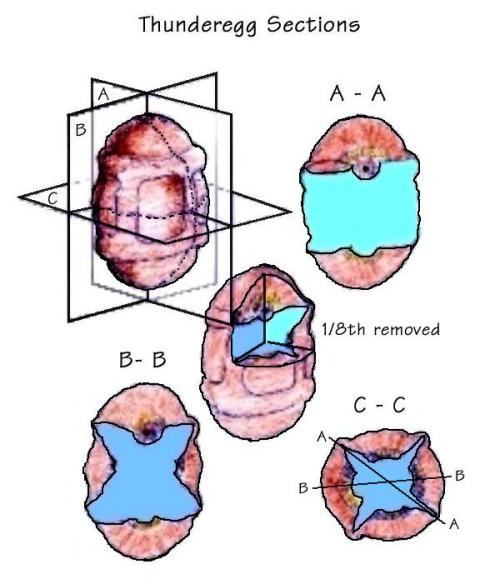
Exterior “suture lines” from where it fractured can assist in showing what to expect inside. Just a split between top and bottom will be a “bi-conoid,” like two Chinese coolie hats. The sides may have two or three side sutures. Most have four, giving a “box core” shaped interior. If five side sutures are present, cutting through them will reveal a five point star.
4. Over time some cavities are filled with varying temperature ground waters that deposited their mineral loads. You can tell by the weight if the TE is solid, half full, or empty. Location, location, location! What minerals are in the ground where the thundereggs formed? If it’s just silica, you can expect clear agate and crystals. If iron is present expect reds and yellows and possibly amethyst crystals. If there are a lot of metals perhaps you will hit the jackpot as was the case with the Priday plume thundereggs, highly prized for their plumes and moss, dendrites and lace patterns. The colors depended on which metals were present.
What was the temperature during fill? If high enough to overcome gravity, expect “fortification” patterns as crystallization took place from all the walls to the center. Cooler liquids placed their deposits from the floor up, flat layer after layer of what we call waterline agate and opal.
Sometimes thunderegg exteriors are coated with small spheroids, making orientation difficult, but Knowledge of the structure of most thundereggs will provide the best guess as to where to cut.
With Spencer opal, you need to cut out the flat fire lines. With waterline agate this may also reveal dendrite layers.

Thunderegg cores

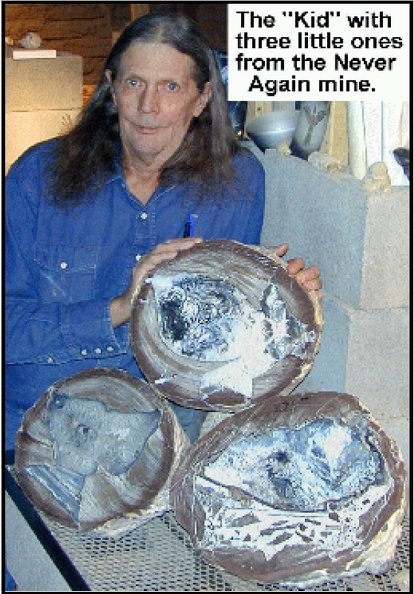
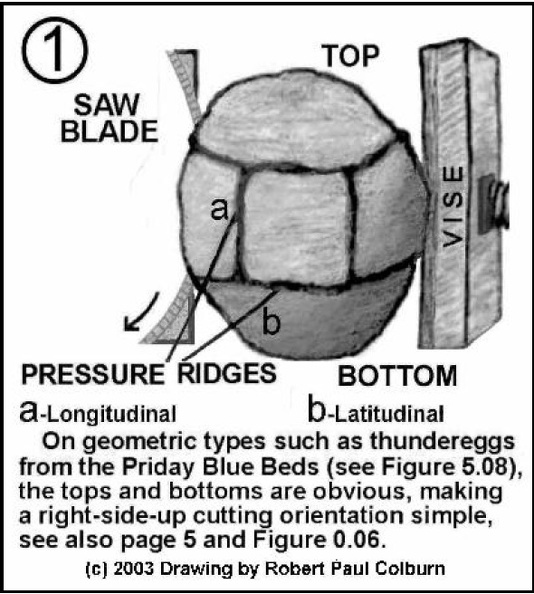
Figure 5.10, Drawings 1, 2 and 3: Cutting Orientation and Marking In-situ.
From: The Formation of Thundereggs-Revised 2004 by the Geode Kid.
Drawing 1 – This is the correct cutting orientation for thundereggs with geometric pressure ridges such as those found at the Priday Ranch deposits like the one shown in Figure 5.08. The tops and bottoms are obvious on these types because there are two ridges, one encircling the upper, the other, the lower circumference of each. They can be imagined as the two tropical latitudes drawn on a globe of the Earth.
There are usually four, sometimes five, vertical ridges intersecting with, but not continuing past the two longitudinal ridges. When correctly cut, all the possible sequences of fills will be in chronological order.
Drawing 2 – The next page below shows the correct cutting orientation for thundereggs showing flow bands. Flow banding is an expression of flowage of the lava they were in which, of course, is horizontal over the surface it flowed. These types often show a slightly to exaggerated drawn out ovoid appearance which is also horizontal with the flow bands so, in most cases, cut perpendicular to them and through the long axis.

If , however, a deposit has been deformed before any type of nodules have been filled, the external features become useless so thundereggs must be marked in-situ, i.e., before removing them as instructed in Drawing 3, also below.
