
Care and Feeding of Rock Saws
By: Richard Gindhart
Published: 2005
Posted on RTH Forum: May 7, 2012
Scope: This article is written to provoke thought about the workings of your rock saw, and give insight to principals of the operation. We will cover some common problems and possible corrections. I have no illusion that I have all the answers related to the process, but my profession of building and maintenance of machinery for the past 35 years gives some experiences in this field.
Safety: Safety is possibly the most ignored area of hobbies, as it is not regulated as in the
manufacturing industries. Being injured at home is just as painfully and disabling as at
work, so safety is just as important. The following items should be given attention in our
hobbies
- Guards and shielding. Exposed shafts, belts, and pulleys should be properly guarded to prevent your body parts or clothing from being severed or wound up in your work.
- Equipment properly grounded, and electrical wiring in good repair and correctly protected against overloading. Use a GFCI (Ground Fault Circuit Interrupter), to prevent electrocution. These devices are relative inexpensive, ($6-7) and easy to install. A GFCI monitors current flow in an electrical circuit, shutting it down if power is ‘leaking’ from the device to. These devices can be installed in ungrounded circuits, (old wiring), and giving ground fault protection.
- Adequate ventilation when grinding, sawing and soldering to prevent inhalation of dust and fumes.
- Personal protection equipment suitable for condition that exist. Safety glasses, gloves, and dust or fume breathing mask.
- Machinery manufacturers recommendations: Use your shop equipment as spelled out in the owners’ manuals. Grinding wheels are a particular dangerous and operated only in accords to manufactures speed recommendation. Make sure that grinding wheel guards are in place and adequate to protect you in case that a wheel disintegrates.
Definitions of Terms:
- Saw: A mechanical device designed to part the material by removing a narrow slot of material from the material.
- Saw blade: The device that performs the cutting action usually made of steel. Modern blade for wood or lapidary use are modified by fixing very hard and tough material of carbide or diamond to the rim to extend blade life.
- Kerf: The slot a saw blades cut in the material that provides relief for the blade. The set of a saw is a mechanical arrangement that places the cutters as the widest portion of the blade.
- Matrix: The material applied to the rim of a diamond saw blade that contains the cutting diamonds and attaches them to the steel blade. This is usually a nickel alloy metal.
- Arbor: The shaft assembly, supported in bearing that transfers the circular motion into the saw blade.
- Saw collars: Side plates that clamp and stabilize the blade to the arbor. The collars are precision machined and should be handled carefully, as any distortion or burring will cause the blade to run untrue.
- Dial Indicator: A device that amplifies small amounts of movement on to a scale or dial to allow precise measurement. The common type would have a 1” measuring range and resolution of .001” per division of the scale.
- Drive system: A combination of belts, pulleys, and bearings that transfer power from the motor to the saw blade.
- Carriage clamp: That portion of the saw system that holds the work piece. Carriage clamp must hold work secure to prevent binding or pinching the saw blade.
- Feed System: The mechanism that moves the carriage into the saw blade. Many variations have been used.
- Coolant and containment: A reservoir that holds excessive coolant/lubricant during the cutting process. This may be a separate tank with circulating pump and filter system.
- Mud saw: A consumable circular disk of sheet steel that passes through a mud bath slurry containing a suspension of abrasive material before running against the work piece. Before the advent of modern diamond saw blades, these were very common.
- Cutting Lubrication: Lubrication is very import in sawing rocks. The lubrication of the saw blade main purpose is to remove the particles and crystal that have been dislodged by the blade and provides cooling for the blade and material to prevent heating.
- Cleaning Lubricant: Saw lubricant can be used until the amounts of solids have started to change its properties, when it should be filtered or replaced. Filtering can be accomplished by pouring the oil in a double paper Kraft bag, suspended over a container. The lubricant will seep through the pores of the paper, leaving the solids behind. This method will clean the oil sufficiently that it can be returned to the saw. The process takes up to a couple of weeks to filter. The bags and sludge can then be placed in a sanitary landfill.
Properties of the lubricating oil that should be considered:
- Toxicity
- Flammability
- Chemically stability
- Ease of handling
- Rust inhabitation
Some of the products that have been used:


How do they work?
- Conventional wood saw is constructed with alternating cutting teeth that score the material and a following “raker” tooth cleans out the kerf. This action creates a “slot” that allows plate clearance to prevent binding of the blade.
- Rock saw blades are not sharp, in the physical sense, as a wood saw blade, but consists of very hard material, usually diamond or tungsten carbide crystals in a metal matrix that “hammer” or “abrade,” a slot in the material, in very small pieces. The rim of the blade is wider than the saw plate. This construction provides “relief” in the cut to reduce the binding of the saw. A lubricating material washes the cut material out of the slot, and cools the blade and material. The abrading of the saw against the rock material creates heat that if not removed will build in the cut, wrecking the blade and/or material. The lubrication fluid also provides a film to reduce wear of blade against work material. The lubricant is present between the blade cutting surface and the work, and consequently must be designed to “break down,” allowing contact to accomplish the cutting action.
- Saw Feed systems. Because the sawing of hard material is a relative slow process, that several systems have been contrived to make this process somewhat automatic. These methods all have good and bad characteristics.
- Manual feed– effectively used on trim saws cutting thin slabs and high value materials. It is time consuming to cut large pieces, and requires some skill to prevent binding or harm to blade.
- Gravity feed system-works well, with the exception that when nearing the ending of the cut, the pressure on thin sections is excessive, and will cause breakout of material. There are modification of this system that allow the “drive” weight be submerged in a bath of water or oil, that reduces its effective weight, (drive), and
- reduces the cutting force as the blade finishes a cut, reducing the break out.
- Secondary motor driven-is not sensitive to blade loading, and continues to feed to point of stalling if the blade stops.
- Geared motion drive from saw arbor-drive is constant throughout the cut, but can create large forces if carriage jams and system lacks slip clutch. Not sensitive to blade loading
- Ratchet driven drive -cleaver arrangement that feeds constant and is sensitive and automatically adjustable to blade loading.
- Hydraulic cylinder powered carriage-feeds to the ability of the saw and material cutting speed. Easily adjustable, but can overfeed on thin sections at end of cut, causing breakout of material.
The saw feed system must be adjustable to accommodate the material being cut, and the ability of the saw to remove the material. Cutting at a feed rate that exceeds the ability of the saw will cause binding of the blade, and can cause heating and blade damage.
Saw blade speed: Prior to doing any cutting, two very important operating requirements need Consideration: the speed at which to run a blade and the use of a suitable coolantlubricant. Each of these has a profound effect on a blade’s overall cutting performance, in terms of life, cutting quality, and speed. The speed at which a blade runs is expressed in two ways, either in revolutions per minute (RPM) or in its peripheral surface speed-surface feet.

Your saw comes from the factory ready to run. Do not make changes without first contacting the
manufacturer since your warranty may be affected.
The following table gives the recommended blade operating ranges, in SFPM, and shows the
approximate corresponding arbor RPM ranges:

Saw Blade Maintenance: “As a new broom sweeps clean, a new saw blade cuts clean.” This is a truth of saw blades, but after you have made many cuts, does the blade cut as well as when it was new? A diamond saw blade will cut many inches of rocks, but just as all cutters, they do wear, and from time to time may need some re-sharpening or adjustment.
- How do you sharpen a blade? A dull diamond saw blade, is usually one that has “glazed over”, or in simpler words, the diamonds on the saw blade rim, have been worn down or knocked out, bringing the matrix that holds the diamonds to the surface. When this occurs, greater force is required to feed the saw through the material and excessive heat will build up in the cut, or worse jamming or deflecting the blade in the cut.
Solution: Make a couple of cuts on a brick or old grinding wheel, will wear down the matrix and exposed new diamond cutters
- The saw blade is cutting well, but binds in the cut? After a blade has been used for some time, the blade will wear the corners of the cutting surface, and may cause a narrow “kerf” that the blade does not have sufficient clearance and binds in the cut. This will happen more often when making deep cuts.
Solution: Remove the blade from the saw arbor and carefully swedge the rim with a light ball peen hammer. Strike the rim straight on with light stroke, being careful to keep the hammer square and centered. This will spread matrix and the diamond cutters, making the kerf of the saw wider that the supporting blade plate, giving it relief in the cut. The amount of swedge put into the blade is only a few thousands of an inch, and should be applied so the spread is equal on both sides of the blade. Care must be taken to not harm the matrix or distort the blade. After this process has been completed, the saw rim can be dressed with a large whetstone to knock down any points that are too high. Cutting a brick or old grinding wheel after this process will also help even up the blade.

- The saw does not cut straight? Several conditions can exist that will cause a crooked cut.
Solution:
- Check blade to insure it is running true, and has not been bent or warped. This is accomplished by placing a dial indicator in the work clamp and moving it to the blade as it rotates. If the blade has excessive run out, it needs to be check for dishing or distortion. Blade run out should be less than .005”. (If you do not have a dial indicator available, a pointed tool, or felt tip marker will work).

- Check that carriage is moving parallel to the blade. Placing a dial indicator in the work clamp (carriage), in contact with the blade, and moving it across the full width of the blade will accomplish this. If this reading exceeds .005”, the system should be realigned. Alignment can be that the saw arbor is not perpendicular with the carriage or the carriage is not parallel with blade

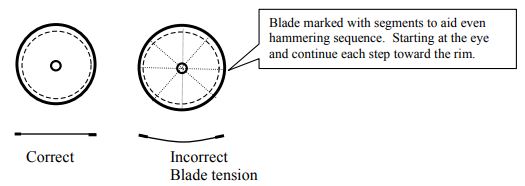
- Blade is dished or has excessive run out: Placing a straight from edge to edge on several plains to check for blade dishing. A dished blade that has lost tension because the rim has “stretched,” or the hub has been expanded. Usually a dished Saw blade will “oil can” when picked up and force applied to the hub. This condition will require the blade to be hammered, or remanufactured. Generally this condition is that the rim has stretched, loosing blade tension. Depending on size and the speed that a blade is rotated at dictates the amount of tension in the rim. Centrifugal force on the blade stretches a blade into shape and keeps it from wandering if properly tensioned.
Solution: This is corrected by marking numbered segments on the blade, and hammering the blade core, in a systematic sequence, stretching the blade and retensioning the rim. Start near the eye of the blade, using one light stroke on each segment line. Insure that the blade is held parallel and flat on the anvil. Move out
approximately 1/3 to 1/4 of the distance to the rim, and repeat the process until 2/3 to 3/4 of the diameter.
Do not hammer at the rim. Use the same impact force on each strike. Test the blade for tension after each completed sequence of stretching. Use a medium weight hammer, 8-10 Oz., and a relative heavy anvil or metal back up. Make sure the hammer face is smooth and has a concave surface. Sand the hammer
face and anvil to remove any scratches or dents, as these will put impressions in the saw blade.
Do not use the “peen” end of the hammer. Hammering a blade requires some skill, and should be practiced on a wasted blade before tackling one that is redeemable. If you feel unsure about this process, it is best to return blade to manufacturing or send it to a competent saw filer.
Other factor causing crooked cutting:
- Incorrect blade or feed speed.
- Improper lubrication/cooling.
- Excessive blade contact angle at start of cut.
- Excessive heating of the saw blade.
- Blade too tight on saw arbor.
The saw blade creates a hammering sound when cutting:
- This condition can be caused by the arbor nut has loosened, allowing the saw to spin on the shaft, wearing the eye of the saw out of round with the rim.
- The blade rim may have had excessive ware on one side of the rim.
- The saw arbor bearing(s) may be in failure.
- Faulty manufactured blade or improperly applied.

The saw blade wobbles on the arbor when turning:
- Can be caused by a work piece has come loose, or a cut piece has wedged between the blade and the carriage, bending the blade. After checking the blade for dishing and eliminating other problems listed above. Using a dial indicator, (or pointed tool or felt tipped pin), mounted in the carriage clamp, measure, and mark the greatest deviation at the rim of the blade. Push that portion away from the high or low, and recheck runout. Repeat this until the runout has been eliminated. Do not over bend the blade plate. Some times a blade will be bent in different directions and locations, and have to be separately adjusted.
- Can be caused by the arbor collars be damaged, causing the blade to wobble. Remove the arbor nut and outer collar, set up the dial indicator and measure the collar for concentric and runout. The collar should be within .0005”, and be clean without any burrs or dings. Do not hammer on arbor or collars, as this will cause damage, that will requiring machining to repair.
- Mark part for profile and indexing: When working with a saw blade and arbor, scribe a mark on each part before removing it, and replace in exactly the same position, will help in maintain alignment.
If you have suggestions to correct or add to this article, please contact me. The item cover herein may not be the latest and greatest, but should give you an understanding of lapidary saws, and some of the problem that occur in there use.
Richard J. Gindhart
r.gindhart@att.net